
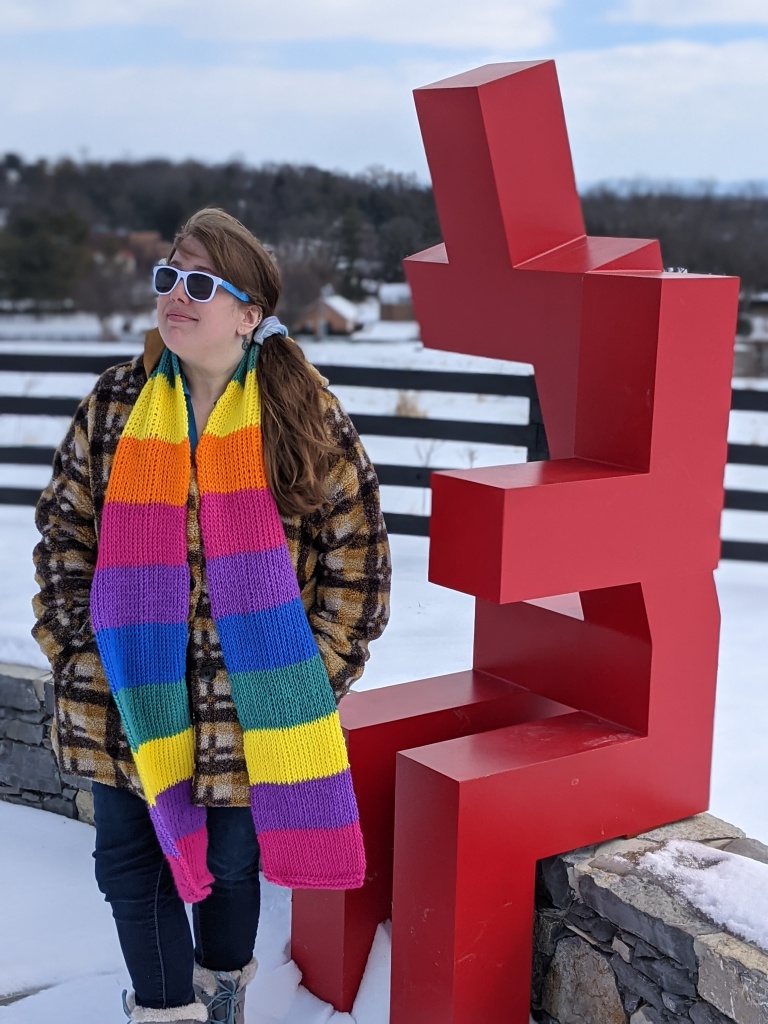
Tunisian crochet is one of my very favorite crochet techniques. It produces some of the loveliest crocheted fabrics, many of them mimicking knit designs. I’m excited to start expanding my Tunisian offerings and I thought, what better way to kick things off than with a free pattern based on, to my movie obsessed mind, an iconic scarf of the 1980s?
A couple of weeks ago my husband and I were revisiting a childhood favorite of ours: Adventures in Babysitting. It’s a classic comedy from 1987 directed by Chris Columbus and starring Elisabeth Shue. I have super fond memories of watching this movie as a kid and thinking that eight-year-old Sara (played by Maia Brewton) was the epitome of cool. She’s a roller skating, Mighty Thor obsessed kid who dishes out snark like that’s her job.
Upon re-watching the film in my 30s, I found that this time I was OBSESSED with the fashion, particularly the amazing knitwear some of the kids are wearing. I spent most of the film being that person who I absolutely cannot stand, asking my husband questions like:
“How wide do you think Elisabeth Shue’s scarf is?”
“What do you think the yarn color is for the block that’s under her collar?”
“Do you think I could pull that off with Tunisian crochet?”
Well, I have good news and more good news. First, I’m still married, so I guess I didn’t get on his nerves too badly. Second, I did, in fact, pull off something inspired by that sweet, sweet scarf using Tunisian crochet, and I am here to pass that knowledge on to you with a FREE pattern and tutorial!


A few notes regarding the pattern:
Now, I can knit. Even serviceably. But put a crochet hook in my hands and I can go like the wind! So, if knitting is your native language, this pattern should be easy enough to adapt. Using the provided measurements, substitute stockinette stitch for the Tunisian crochet.
I used yarn that I had handy in my stash to replicate the look from the movie, but I’m already thinking ahead to different color combinations, different fibers, different weights… the options are endless! I am rounding up just a little bit on the yardage required to make the scarf (listed in materials) just to be on the safe side, but the totals for each type of yarn are distributed across different colors, so keep that in mind. I did not use an entire skein of any of the colors listed.

I used a large hook for this project, larger than the manufacturer’s recommendation, and probably a little bit bigger than what I thought I could get away with. Tunisian crochet, particularly the knit stitch, tends to curl like you would not believe. Using a larger hook helps cut down on that, and increases the drape of the scarf, which I also like. A light steam blocking when the project is finished may also help with curling and drape.
The finished scarf measures 85” in length and 8” in width. If you’re having problems meeting this gauge, experiment with different hook sizes until you get it. Or you can go wider, narrower, longer, shorter… It’s up to you!
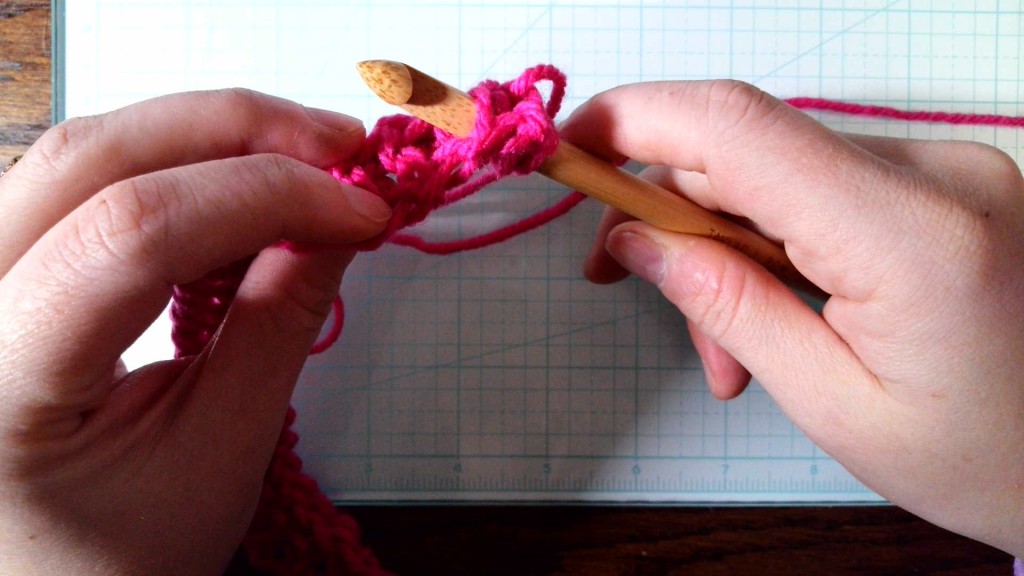
Each row will consist of pulling up loops in the Tunisian style and a return pass. Most of the scarf is worked using the Tunisian knit stitch (TKS), but there are a couple rows of Tunisian purl stitch (TPS) (to help combat the curl) and casting on and off. Instructions are provided.
A brief overview of Tunisian crochet:
Normally, when we crochet, we use our hooks to make one stitch at a time working flat across a project and we flip it over and work back across the rows, stitching and flipping, until the project is done. Tunisian crochet is a bit different. With Tunisian style, all the stitches that we are working across a given row will be on the hook at the same time. Each row is worked in two parts. The first part consists of inserting your hook where it needs to be and pulling up a loop for each stitch all the way across the row. The second part, or the return pass, is finishing off those stitches and completing the row by yarning over and pulling the yarn through the loops we made in step one. Tunisian stitches form small vertical bars across the rows of our projects, and the look of the stitch is determined by where we insert our hook and the position of the yarn relative to those vertical bars. Each vertical bar is a pair. There’s one on the front (facing you) and one on the back of the project. Don’t worry if it sounds confusing. Once you get going, this method can be a breeze. If at any point you need help, scroll all the way down to refer to my video tutorials. More details are given in the written pattern, as well.
Materials:
-8.0 mm Tunisian crochet hook
-Roughly, a total of 520 yards of worsted weight yarn divided like so:
-Big Twist: 270 yards
-Red Heart Super Saver: 155 yards
-Red Heart Classic: 95 yards
Color A: Big Twist Value Worsted Magenta
Color B: Red Heart Classic Bright Violet
Color C: Big Twist Value Worsted Varsity Yellow
Color D: Red Heart Super Saver Jade
Color E: Red Heart Super Saver Royal
Color F: Big Twist Value Worsted Orange
-Measuring tape or ruler
-Scissors
-Yarn needle
Abbreviations:
Ch: chain
YO: yarn over
TPS: Tunisian purl stitch
TKS: Tunisian knit stitch
Rep: repeat
Sl st: slip stitch
FO: fasten off
Pattern:
With color A, ch 22.


Row 1:
Pull up a total of 22 loops across.
To cast on your first row of Tunisian crochet stitches, work back along the ch, starting in the second ch from hook. The loop that is on your hook before you begin will count as a st. Insert hook in 2nd ch, YO, pull up a loop. You have two loops now. Leave them on your hook and move on to the next ch. Insert hook, YO, pull up a loop. Repeat this process all the way across the ch.
Return pass: YO, pull through 1 loop (this is your ch st for the next row). *YO, pull through 2 loops*, rep *-* until 1 loop remains.

Note:
The return pass for each row will be the same as row 1’s return pass.
Row 2:
TPS across. (22)
For Tunisian purl stitch, you will bring the working yarn to the front of the project. Insert your hook under the second vertical bar on the front of row 1 making sure that the hook stays behind the working yarn as you are inserting (the loop that is on your hook counts as the first st of the row and goes with the vertical bars directly below it. Do not insert there). YO and pull up a loop onto your hook.
Important note:
For every row, make sure you are working the same number of stitches in each row. The last loop you pull up in the first pass should be under the two vertical bars at the very end of your row.
Return pass.


Row 3:
TKS across. (22)
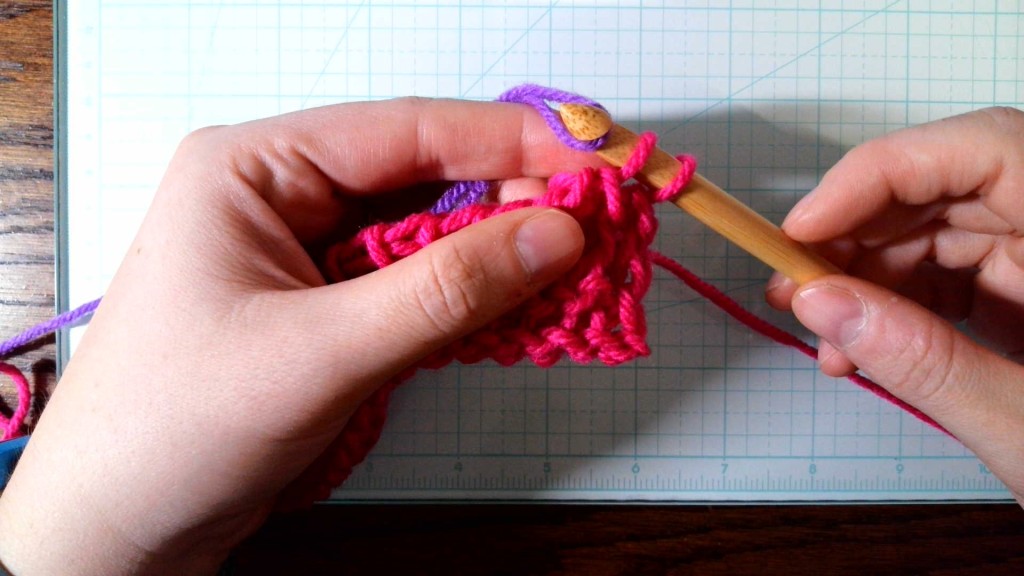
For Tunisian knit stitch, you’ll have the working yarn in the back of the project, like normal. We’re still inserting the hook in the vertical bar, but in a different position. Take a look at the second vertical bar of the last row you finished (remember, the loop on your hook counts as your first st so don’t insert your hook in the very first set of vertical bars). You’ll see there’s another vertical bar behind it. Find the middle, between the vertical bar in the front and the one in the back. We want to insert the hook right through the middle of that vertical stitch, diagonally back. YO and pull up a loop as normal. You will start to see the knit pattern emerge after 3 or 4 rows. It will also really start curling in on itself. This is normal and will become less noticeable as you go.
Return pass.


Rep row 3 until section measures 4” long in TKS (not counting first two rows). Switch to color B.
To change colors, work your final return pass as normal until you have two loops remaining on your hook. Drop the old color and pull the new one through both loops. Work the rest of the row as normal. Give tails a GENTLE tug to make sure they are at the same tension as the rest of your project.


Rep row 3 until section measures 4” long. Switch to color C.
Rep row 3 until section measures 4” long. Switch to color D.
Rep row 3 until section measures 4” long. Switch to color E.
Rep row 3 until section measures 4” long. Switch to color B.
Rep row 3 until section measure 4” long. Switch to color A.
Rep row 3 until section measure 4” long. Switch to color F.
Rep row 3 until section measures 4” long. Switch to color C.
Rep row 3 until section measures 4” long. Switch to color D.
Rep row 3 until section measures 4” long. Switch to color E.
Rep row 3 until section measures 4” long. Switch to color D.
Rep row 3 until section measures 4” long. Switch to color C.
Rep row 3 until section measures 4” long. Switch to color F.
Rep row 3 until section measures 4” long. Switch to color A.
Rep row 3 until section measures 4” long. Switch to color B.
Rep row 3 until section measures 4” long. Switch to color E.
Rep row 3 until section measures 4” long. Switch to color D.
Rep row 3 until section measures 4” long. Switch to color C.
Rep row 3 until section measures 4” long. Switch to color B.
Rep row 3 until section measures 4” long. Switch to color A.
Rep row 3 until section measures 4” long.
Next row (still color A): rep row 2. (TPS 22)
Return pass
Cast off row: TPS sl st cast off across (22)
To work the Tunisian purl cast off, bring working yarn to front in the usual TPS manner. Pull up a loop like you normally would, only instead of leaving it on your hook, pull it all the way through the existing loop on your hook as you would a sl st.


FO any remaining yarn and weave in ends. Light steam blocking may be necessary, especially at the ends of the scarf, in order to prevent curling that is characteristic of Tunisian crochet.

Pattern and photographs © Sarah Perks 2021.
Do not copy or reproduce in part or in its entirety and claim as your own.
Make/sell/share any items made by your own two hands, as always.
Provide your own photos.
A link back here is always appreciated.

I am knitting this scarf after rewatching the movie! What color did you do in between the green, behind the neck? Thanks!!
LikeLike
It’s such a fantastic pop culture accessory, right?? I finally settled on blue for behind the neck. Happy knitting!
LikeLike